A Guide to Perfect At-Home Dental Impressions.
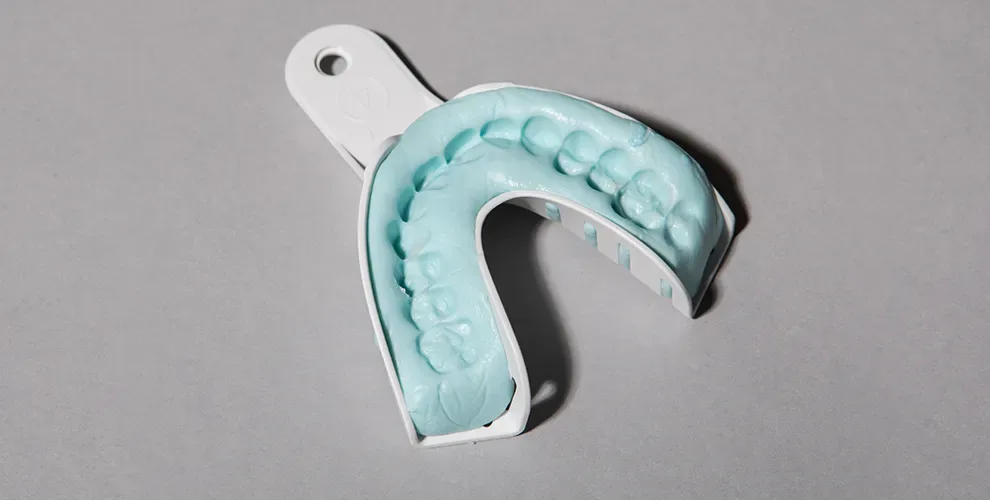

Table of Contents
- Troubleshooting
- How to do them right
- Why at-home dental impressions matter
Your path to a better smile begins with perfect impressions. Dental professionals use these imprints of your teeth to make aligners that fit your mouth. The better your impressions, the more likely it is that your aligners will sit on your teeth comfortably.
What happens if the impressions aren’t right?
At-home aligners start with detailed dental impressions. The information you provide in this step helps your dental team understand where your teeth are now and where they should go with the appropriate care plan. They’re very important.
The consequences of a poor impression kit can include the following:
Poor fit for your aligner trays
Longer treatment times
Discomfort from rubbing trays
Teeth moving differently than anticipated
It’s important to take your dental impressions seriously and follow all detailed instructions.
How to create at-home dental impressions
This step-by-step plan will help you create the models dental experts need. Read through the entire guide before you get started, as some steps are dependent on prior steps done right.
Step 1: Clean your teeth
Your teeth must be very clean before you start your at-home dental impressions. Your dental team must have a clear understanding of your tooth placement from root to tip, and bits of food can get in the way.
Food stuck in your teeth can move into your dental impressions. That could confuse the team making your aligners. Is that bump a tooth? A popcorn kernel? Your team won't know, and that could make your clear aligners less effective and perhaps less comfortable.
Prepare your teeth by:
Brushing for two minutes. Use a soft-bristle brush, and don't press too hard as you move the toothpaste around your teeth.
Flossing. Ensure that no tiny food particles sit between your teeth. Use floss between all of your teeth to reach every nook and cranny.
Rinsing. Use a mouthwash, and swirl it around your teeth. Tiny particles you dislodged with your work should go down the drain when you spit.
Dentists say everyone should brush twice per day. Surveys suggest that about half of us only brush once per day. If you only brush once, do so right before you make your at-home dental impressions.
Step 2: Check the tray size
An at-home dental impression kit comes with several sets of trays. Two fit on your upper teeth, and two fit on the lower. You'll mail these plastic pieces back after they are filled with hardened putty.
You'll use one tray at a time, and while they may not feel comfortable inside your mouth, they should fit properly. The right tray will:
Cover your teeth. Pull your lips back, and you shouldn't see your teeth peeking out over the top of the plastic lip.
Feel roomy. The tray shouldn't touch or pinch your teeth when it's empty. You'll need room for the putty.
Fit well front to back. Your back teeth shouldn't hang out of the back end of the tray.
If your trays feel too small or too large, call the company before you get started with your impressions. You might need a new set sent to you before you begin.
Step 3: Mix your putty
Putty hardens around your teeth, but it shows up soft and pliant in your impression kit. Typically, you'll start the formal impression process by mixing two types of putty.
To complete this step:
Empty both types of putty into your hands. Scoop out the light putty and dark putty into the palm of your hand.
Squeeze them together. Mash the two colors together vigorously until the putty in your hands is one uniform color.
Watch the clock. Don't mash the putty for longer than 30 seconds, or it will begin to harden.
Roll and fill. Push the putty between your hands until it's one log-like shape that you can press into one impression tray.
Step 4: Align and push
Your tray is filled with putty, and you're ready to showcase your pearly whites.
To finish this step:
Align. Find the center of the tray, and line up your center teeth with that space.
Push with your thumbs. Push your teeth into the tray until the putty covers your gum line. Stop before the bottom of your teeth hit the tray.
Center. Ensure that both sides of your teeth are pushed evenly into the putty.
Don't bite. You might be tempted to push down on the trays with the strength of your jaws. Resist the urge! Biting pushes your teeth to the bottom of the trays, and that makes your impressions less effective.
You don't have to be a dental expert to make perfect at-home impressions of your teeth. But you will need patience and precision to do the job right.
Step 5: Watch the clock
The putty should harden a bit before you remove your teeth, and that takes time. Remove the trays too early, and you won't have a firm impression. Leave the putty on too long, and it's hard to remove.
Set a timer for 3.5 minutes. Remember that this is a crucial step toward a better smile. Patience is key.
Step 6: Control your gag reflex
Do your dental impressions the right way, and the putty will push against the top of your mouth and into the back of your throat. You might be tempted to gag or choke. Prepare for that and take action.
You can lower your gag reflex by:
Sitting up straight. Saliva won't run down the back of your throat if the top of your head is pointing at the ceiling.
Leaning forward. If you still feel as though you might gag, put your feet on the floor and tip your head toward the floor.
Controlling your breathing. Focus on breathing in through your nose on a count of 10.
Distracting your mind. Look out the window, or watch your cat play. Take your mind off your mouth, and the sensation might fade.
Step 7: Remove your tray
When your timer dings, it's time to take the trays away from your teeth. The putty will harden, so you might need to wiggle or tap the tray to loosen it. Then pull with gentle pressure to slide the materials away from your teeth.
Step 8: Repeat
You'll take four separate dental impressions of your teeth: two on the top, and two on the bottom. They'll get easier and easier each time.
You can do this!
Step 9: check your work
You’ll know you’ve done a good job when your impressions show all of your teeth, from the root to the tip and from the front to the back. The tray should show a little of your gums, too. The impressions should be solid and free of bubbles and gaps.
If all of your trays aren’t perfect, don’t worry. However, contact the company and ask for help if all of your trays don’t look quite right.
Troubleshooting common problems
Anyone can do at-home dental impressions, including people who have never done so before. However, it can be a slightly unusual process. Following a few best practices can ensure you give your dental team just the right.
These are a few common issues people face:
Trapped air: If the putty looks bubbled, tap the tray on the counter to release air pockets before sliding the trays on your teeth.
No visible gums: If you can’t see the space where your teeth enter your gums, try pushing on the next set of trays when you insert them.
Too much gums: If you’ve pushed too hard and your teeth touched the bottom of the tray, use just your fingers to push on the tray next time. Don’t bite down.
Blurred impressions: If you’re prone to fidgeting, you could move and slide around in your trays. Do something like reading while you wait and remember to stay still.
Hard putty: If you wait too long to put in your trays, the material will harden. Remember to move quickly to ensure the material doesn’t firm up before it’s time.
At-Home Dental Impressions Frequently Asked Questions
These are the questions we often hear about at-home dental impressions: